New electric 50L setup

The forum for discussing all kinds of brewing paraphernalia.
rob-63

New electric 50L setup

Post by rob-63 » Tue Jun 03, 2014 10:50 am

Hello all,

New to the forum (and quite new to AG brewing), but have been lurking and getting a lot of useful tips and ideas while changing over from a coolboxes & cygnet boiler setup to a new shiny electric kit (based on the electric brewery website route), which has taken about 3 months to build and managed the first brew last weekend!

Anyhow, here are a few pictures if anyone is interested. At present it’s a portable(ish) setup, either for the kitchen or out on the patio weather permitting! Hopefully, moving house later in the year and it will get a permanet home.

So, overview of the setup. HLT is 100L, Mash Tun and Boiler are 70L, so should be ok for 50L brew lengths. All pots were bought undrilled, allowing me to put outlets (all are bottom draining), inlets and sight tubes where I wanted.

Image

Other pictures to follow…

Rob.

rob-63

Re: New electric 50L setup

Post by rob-63 » Tue Jun 03, 2014 11:14 am

Control box.

Basically followed the electric brewery website, but with just a few differences.
Image

Image

Not the neatest wiring… but it works.
Image


HLT and the HERMS coil before fitting
Image

Mash Tun with false floor
Image

Mash Tun during sparging, via a removable rotating sparge arm. Manages to still turn at rates lower than 1L minute.
Image

Counterflow chiller during build, using straight lengths of 10mm copper tubing (just over 4M in total). This follwed the method from a jbk thread, I think by Fil
On the brew day I recirculated back into the boiler as unsure of how well it would cool. Managed to get the 25L in the boiler from 98C down to under 30C in about 15 minutes.
Image

Hop debris left in the boiler
Image

User avatar
fordpopular
Piss Artist
Posts: 195
Joined: Wed Feb 22, 2012 12:13 pm
Location: Allenheads Northumberland 425m above sea level

Re: New electric 50L setup

Post by fordpopular » Tue Jun 03, 2014 5:44 pm

very nice setup, would be interested to see how you have made the chiller, looks interesting

subfaction
Hollow Legs
Posts: 496
Joined: Fri Feb 25, 2011 1:46 pm
Location: Leamington Spa, Warwickshire, England

Re: New electric 50L setup

Post by subfaction » Tue Jun 03, 2014 5:57 pm

Very nice, I'd love to have the time, wonga and wife buy-in to build something like this... Happy brewing!

User avatar
themadhippy
Even further under the Table
Posts: 2952
Joined: Tue Dec 08, 2009 12:53 am
Location: playing hooky

Re: New electric 50L setup

Post by themadhippy » Tue Jun 03, 2014 6:14 pm

Are those hubble twist locks? nasty connectors with pins that bend if you look at em wrong
Warning: The Dutch Coffeeshops products may contain drugs. Drinks containing caffeine should be used with care and moderation

rob-63

Re: New electric 50L setup

Post by rob-63 » Tue Jun 03, 2014 6:47 pm

fordpopular wrote:very nice setup, would be interested to see how you have made the chiller, looks interesting
Thanks. Basically I followed the idea in the thread by Fil here viewtopic.php?f=6&t=61868&hilit=counter ... er#p650819

Mine is a bit different in that I used copper tubes, and also that I soldered the ends of the tubes into the tee fittings (22x15x15), with reducers(15 to 10), instead of using bungs.

Basically, it has straight copper tubes, with removable silicon tubes at each end, for the wort. On the outlet and inlet it has cam fittings for quick attachment of tubes.

These are encased by 25mm i/d pvc tubing which is on the outside of the tee at each end and held in place with a hose clip, through which the cooling water travels. At each end it travels from tee to tee through a piece of 15mm copper tube. Electrical cable is spiralled around the outside of the copper tube to give turbulence to the water flow. Hoselock fittings are used to attach the water in supply and outlet.

After use, when it is backflushed with the saved warm water, the end silicon tubing can be removed and a 2m long brush, with cleaning solution, pushed down the tubes to clean further.

A pic during the build.
Image

And almost finished.
Image

rob-63

Re: New electric 50L setup

Post by rob-63 » Tue Jun 03, 2014 6:53 pm

themadhippy wrote:Are those hubble twist locks? nasty connectors with pins that bend if you look at em wrong
The connectors for the elements? Yep, Nema things - the receptacles are Hubbell and the plugs are Pass & Seymour.

I did struggle a bit on what to use for the 30 amp connectors, even after looking at various threads on here and elsewhere there didn't seem to be a decent European equivalent - but I'm sure there must be - so I went with the US type. They seem fine so far.

rob-63

Re: New electric 50L setup

Post by rob-63 » Tue Jun 03, 2014 6:58 pm

subfaction wrote:Very nice, I'd love to have the time, wonga and wife buy-in to build something like this... Happy brewing!
Thanks. You have to get divorced first... although that costs a little bit more!! #-o ... then have a partner that is ok with it. :)

setmash

Re: New electric 50L setup

Post by setmash » Tue Jun 03, 2014 9:34 pm

What a fantastic build well done mate you should be proud, can you take some more shots of your sparge arm, im building something similar and wouldnt mind some more detail it looks the dogs. Nice chiller (goat) build. Very nice indeed, id be interested to see how you get on with that. Ive spent hours considering what to do about chilling. Im currently immersion chilling and after seeing how protein can build up in my RIMs module im not sure I want anything on the cold side.

Aaron

Re: New electric 50L setup

Post by Aaron » Tue Jun 03, 2014 9:37 pm

I keep seeing these cool wooden mash paddles. Where did you get yours?

rob-63

Re: New electric 50L setup

Post by rob-63 » Tue Jun 03, 2014 10:22 pm

Thanks setmash. It's only done one brew so far, but both the sparge arm and the chiller worked as well as i hoped. I'll try to do a bit more testing on the chiller on the next brew day.

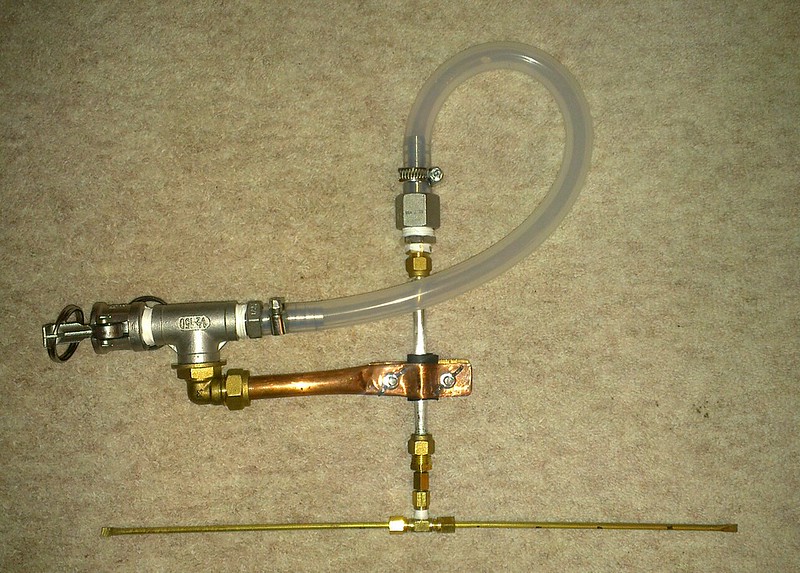
Here's another pic of the sparge arm
Image

I think that shows it quite clearly - it has a cam fitting that goes into the tee; out of the bottom of the tee is an elbow (with a plug inside) that is just for the 15mm copper tube that has been sawn and flattened for a bit of height adjustment.

Out of the end of the tee is a hose barb fitting then silicon tubing to another hose fitting which is stepped down to a piece of 8mm aluminium tube (held by the height adjuster); this is then further stepped down to a short piece of 4mm tube, then a 4mm compression tee. The 4mm arms each have four holes, I think 1.5mm diameter.

Aaron - The mash paddle was just made from a 25mm x 800mm piece of American walnut from a local woodyard. A bit of jig sawing, drilling, filling, with a final rub down, and that's it.
Image

Fil
Telling imaginary friend stories
Posts: 5229
Joined: Sun Oct 16, 2011 1:49 pm
Location: Cowley, Oxford

Re: New electric 50L setup

Post by Fil » Tue Jun 03, 2014 10:31 pm

Straight Pipe counterflow chillers rule ;) -
good call on the copper flex, the coax i used is rusting at the ends ha :)

I like the mesh whole bottom filter, but notice its not clinging to the edge too well, it may be worth considering capping the top edge,split beer / gas line would work,

Are those scales sat under the tun ?? - the pot legs allow u a smaller footprint = cheaper scales And facilitate bottom draining 10/10 for thinking that thru..

Thats a very well planned and thought through brewery, =D> =D>

rob-63

Re: New electric 50L setup

Post by rob-63 » Wed Jun 04, 2014 9:29 am

Fil wrote:Straight Pipe counterflow chillers rule ;) -
good call on the copper flex, the coax i used is rusting at the ends ha :)
There wasn’t that much thought behind it – as it was just what I had laying around... but good thing I did as mine is stuck in there! :)
Fil wrote:I like the mesh whole bottom filter, but notice its not clinging to the edge too well, it may be worth considering capping the top edge,split beer / gas line would work,
The mesh was a bit of an afterthought, as I do have a copper tube manifold filter in there as well, (pic below) so the mesh could be a bit of overkill. Although, if I have some tube I might well cap it too.
Fil wrote:Are those scales sat under the tun ?? - the pot legs allow u a smaller footprint = cheaper scales And facilitate bottom draining 10/10 for thinking that thru..
Yes, they are scales (the lcd is shown in the op picture). Again, these were another afterthought – although, even a flat bottom pot could use the smaller size, they would just overhang slightly?

The main reason for adding the legs was so that I could have all the pots bottom draining, and to be able have the sight tubes giving readings to less than 2L, as opposed to those on the sides of pots which must start at around the 5 or 6 L point?

Copper manifold in boiler
Image

Cheers,
Rob

User avatar
barneey
Telling imaginary friend stories
Posts: 5423
Joined: Mon Jul 25, 2011 10:42 pm
Location: East Kent

Re: New electric 50L setup

Post by barneey » Wed Jun 04, 2014 9:50 am

Nice looking set up + should be an interesting visit (to collect the BE)

This is my "goat" cfc

Image
Image
Image
Image
Image
Image
Image
Image
Image
Image
Hair of the dog, bacon, butty.
Hops, cider pips & hello.

Name the Movie + song :)

rob-63

Re: New electric 50L setup

Post by rob-63 » Wed Jun 04, 2014 10:03 am

Yep, looking forward to picking it up!

How did you do the forming you have on the tube there? A more robust solution that the cable... and won't rust :)

Oh yes, why are they called goat chillers?

Post Reply