Part 3, the wort chiller, & some questions

The forum for discussing all kinds of brewing paraphernalia.
Post Reply
VANDEEN

Part 3, the wort chiller, & some questions

Post by VANDEEN » Thu Nov 12, 2015 8:53 pm

Last night saw the completion of my wort chiller, (told you I wouldn't be able to resist buying some copper when seeing my mate at the plumbers merchant ;-) )

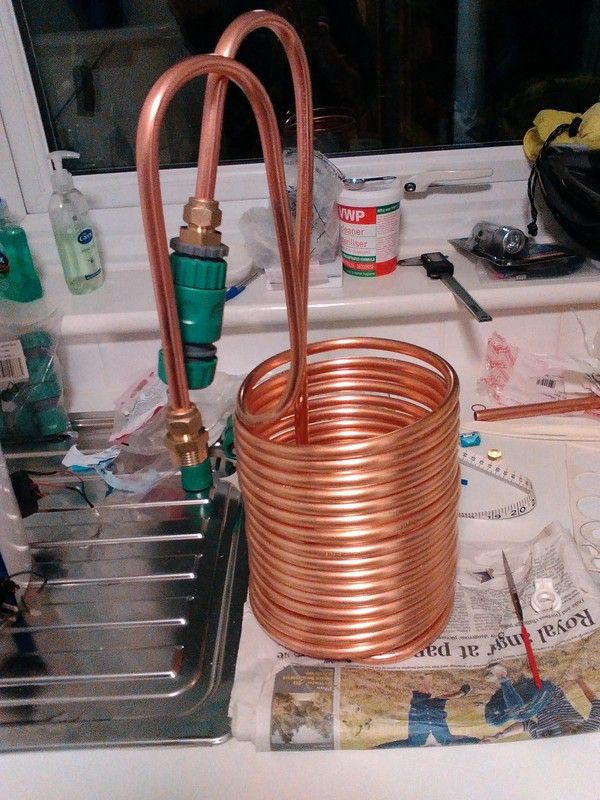
I didn't follow most of the instructions I've seen on youtube which involved the straightening of the coil first as I was wrapping it around a 2.5L hammerite tin & didn't fancy the lid popping off as I was rolling [-o< it so chose to work vertically.

I had to borrow a 10mm external bending spring for the tighter curves, like this £4.98 one from B & Q http://www.diy.com/departments/pipe-ben ... 174_BQ.prd as this stuff kinks way to easily when going for a tight radius.

I ran out of height on the tin after a while so stood it on another smaller one and kept going.

Given that I may get a bigger kettle at some point I built in a bit of extra height on the upright tubes to allow it to hopefully reach/near the bottom of a "keggle" or similar. And wanting to use the full 10M of pipe I calculated them so I wouldn't have to lose any
Image

Ends were finished of with a couple of 10mm - 15mm screwfix compression fittings @ £1.99 each 2 x 51238 http://www.screwfix.com/p/reducing-coup ... tid=241484

and the tap adapter with its 3/4 to 1/2" reducer fitted from this kit http://www.screwfix.com/p/hose-connecto ... eces/70310 .
The connectors will be useful when I "liberate" a few foot from our garden hose ;-)

The other tap connector came from one of these kits as they were a pound cheaper @ £1.99 and that was the only bit I really wanted http://www.screwfix.com/p/hose-connecto ... tid=242236

I've since found just the ends, complete with the reducer, available on their own at B & Q for only a quid here http://www.diy.com/departments/bq-1/2-3 ... 833_BQ.prd

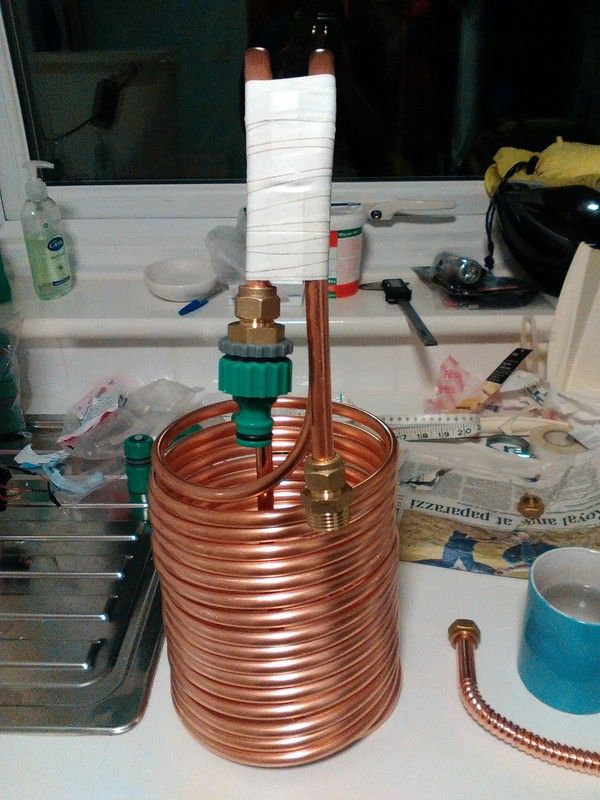
I space the pipes with some plastic blocks and taped them up pending finding/making a better spacer & making more permanent with jubilee clips.
Image

So all I need now is the adapter to fit a hose onto the mixer tap, on order on e-bay & due tomorrow, & that should see me doing a full
hot wet test & chill down test ready for my first ever extract brew over the weekend :-)

So onto some questions....

I'm thinking of soldering a stop end onto a bit of scrap 15mm pipe & clamping that to the inside of my bucket with my temp probe running down inside & the open end loosley packed with tinfoil for temp measurement, this will probably only be until I get a stainless bolt & drill it from the head end and permanently install a home made "thermowell" in the wall of the kettle complete with more homemade silicone washers and a nut on the inside. What do you think?

How / do you all clean all these new components prior to their first usage? I guess they may well be covered in some sort of protective film to preserve them & I don't want that in my beer!!

Do I dismantle everything & starsan soak the lot?
or
Just use hot soapy water & rinse well then do boil test & drain via the tap? & then sterilise before starting the brew?
or
Just test boil then go?

Cheers guys, I'll be posting up elsewhere for someone to check my conversion from the AG recipie to extract & posting a timeline & list of what I think I need to do when and in what order for final confirmation that I understand / haven't forgotten anything


Cheers :-)

User avatar
Deebee
Even further under the Table
Posts: 2324
Joined: Thu May 21, 2009 9:13 am
Location: Mid North West Norway

Re: Part 3, the wort chiller, & some questions

Post by Deebee » Fri Nov 13, 2015 6:15 am

Nice job.
Personally i would put some space between the coils on the chiller. This gives a larger surface area/contact area for the wort and will speed up cooling.
As for cleaning i would use a standard cleaning solution like oxy and a sponge scourer. Soak them scrub the. Rinse them.

Nothing tondo on the inside of the chiller though. It is a sealed system so will be fine. Impressive build. =D>
Dave
Running for Childrens cancer in the Windsor Half marathon.
Image
Please consider helping a good cause:)

BenB

Re: Part 3, the wort chiller, & some questions

Post by BenB » Fri Nov 13, 2015 8:33 am

Very nice! I should have used 10mm. I had some 8mm and used that and it's somewhat wobbly- the 10mm ICs always look much sturdier....

User avatar
themadhippy
Even further under the Table
Posts: 2968
Joined: Tue Dec 08, 2009 12:53 am
Location: playing hooky

Re: Part 3, the wort chiller, & some questions

Post by themadhippy » Fri Nov 13, 2015 9:24 am

get rid of the tape asap or youll forever be trying to get the stickiness off,i use copper wire to hold mine together, the earth wire out of a length of twin n earth is ideal.
Warning: The Dutch Coffeeshops products may contain drugs. Drinks containing caffeine should be used with care and moderation

Fil
Telling imaginary friend stories
Posts: 5229
Joined: Sun Oct 16, 2011 1:49 pm
Location: Cowley, Oxford

Re: Part 3, the wort chiller, & some questions

Post by Fil » Fri Nov 13, 2015 5:00 pm

themadhippy wrote:get rid of the tape asap or youll forever be trying to get the stickiness off,i use copper wire to hold mine together, the earth wire out of a length of twin n earth is ideal.
+1

i did the same, and dab some flux on the wire too so you can solder it in place for a permanent fix.

make sure you have room for a big spoon in the kettle with the chiller, moving/stirring the hot liquor over the coils will cut the chill time dramatically..

cleaning.. grab some generic unscented laundry oxy for circa £2-£3 per kilo, soaps and detergents have chemicals in them which you dont want near your beer as they kill head retention and they can resist the best of rinses..

remember to collect the Hot output from the chiller to clean the kettle with, and control the flow for a hot output, you wont need the water on full blast..

looks like your brewery is coming along Very nicely.. keep the momentum up..;)
ist update for months n months..
Fermnting: not a lot..
Conditioning: nowt
Maturing: Challenger smash, and a kit lager
Drinking: dry one minikeg left in the store
Coming Soon Lots planned for the near future nowt for the immediate :(

VANDEEN

Re: Part 3, the wort chiller, & some questions

Post by VANDEEN » Sat Nov 14, 2015 4:26 am

Cheers for the replies / compliments guys, the tape has now gone! :-) Replaced with a couple of wraps of silicone bakng sheet & two jubilee clips.

Prior to reading your replies (oops) I'd given the whole thing a good scrub with fairy liquid as it definitely felt a bit oily & is currently sitting in clean water overnight ready to go into sanitiser before it goes anywhere near my kettle.

Disassembled the tap, hop stopper, thermometer tube etc and gave them all the same treatment.

Bought some £1 shop oxy & will briefely soak the lot, inc the kettle & all other brewing tools in either that or a VWP solution today/tomorrow prior to full test boil/chill and maybe once more before brewing. Everything will be rinsed well + starsan spray immediately before use (once i pick up a spray bottle that is) then hopefully good to go :-)

irv
Steady Drinker
Posts: 92
Joined: Thu Apr 12, 2012 5:32 pm

Re: Part 3, the wort chiller, & some questions

Post by irv » Sat Nov 14, 2015 1:13 pm

VANDEEN wrote:Cheers for the replies / compliments guys, the tape has now gone! :-) Replaced with a couple of wraps of silicone bakng sheet & two jubilee clips.

Prior to reading your replies (oops) I'd given the whole thing a good scrub with fairy liquid as it definitely felt a bit oily & is currently sitting in clean water overnight ready to go into sanitiser before it goes anywhere near my kettle.

Disassembled the tap, hop stopper, thermometer tube etc and gave them all the same treatment.

Bought some £1 shop oxy & will briefely soak the lot, inc the kettle & all other brewing tools in either that or a VWP solution today/tomorrow prior to full test boil/chill and maybe once more before brewing. Everything will be rinsed well + starsan spray immediately before use (once i pick up a spray bottle that is) then hopefully good to go :-)
You prob know this but, once you have cleaned any oils or residue from manufacture etc, you only need to starsan your fermentor and bottles / kegs and anything that that is used to transport between them. ie the cold side after the boil
anything else that gets covered in bugs before the boil, is going to be heated up to 100 C which will kill most things (apart from Hyperthermophile )

VANDEEN

Re: Part 3, the wort chiller, & some questions

Post by VANDEEN » Sat Nov 14, 2015 1:29 pm

Cheers Irv, :-) I've never used Starsan before only ever VWP.
I have only considered it now because of all the sewage works going on round here & the, all be it slight, chance of an infection from my rinsing water.
Maybe I'm just a bit a bit paranoid when it comes to hygeine coming from the "cold side" i.e. Kit brewing.

I just worry that things like the tap, or its silicone washers might harbour some nasties and be far enough away from the "hot stuff" for them to survive.

PS I'm also the kind of guy who has a waterproof coat and a brolly ;-)

Post Reply