Making an yeast starter

Get advice on making beer from raw ingredients (malt, hops, water and yeast)
adm

Re: Making an yeast starter

Post by adm » Fri Oct 24, 2008 11:16 pm

Maybe :D

Thing is, you just can't tell with some yeasties.

Pitch it, keep it somewhere warm, give it a good shake as often as you can betwen now and chucking it in your wort.


Either way, it should be fine - it just might take a bit longer to start.

PaulStat

Re: Making an yeast starter

Post by PaulStat » Sun Oct 26, 2008 9:27 am

Well it's all done, yeast starter was pitched at 420pm yesterday. No sign of anything happening yet, I hope the yeast isn't dead.

adm

Re: Making an yeast starter

Post by adm » Sun Oct 26, 2008 11:02 am

PaulStat wrote:Well it's all done, yeast starter was pitched at 420pm yesterday. No sign of anything happening yet, I hope the yeast isn't dead.
I doubt it will be dead - just might take a couple of days to get going. You know what they say:

"Relax, Don't Worry and Have a Homebrew"

mysterio

Re: Making an yeast starter

Post by mysterio » Sun Oct 26, 2008 5:24 pm

A lag time under 24h is fine, after 48h is abnormal and it generally means yeast health is poor.

PaulStat

Re: Making an yeast starter

Post by PaulStat » Mon Oct 27, 2008 10:12 am

Checked it again yesterday evening, and the airlock is now bubbling away :)

booldawg

Re: Making an yeast starter

Post by booldawg » Mon Oct 27, 2008 10:24 pm

Good news! glad its well under way 8)

hoppingMad

Re: Making an yeast starter

Post by hoppingMad » Tue Oct 28, 2008 12:29 am

A few months back I decided that if I had to make starters from liquid yeasts ( Wyeast) then I may as well get into storing my own frozen yeast. There is only a couple of steps extra in doing this and it also meant huge cost savings, I no longer have to pay big bucks for imported Wyeast. I now have five strains on ice and they work great, taking 4-5 days to step up from a thimble size amount, to enough for pitching into a lager. I must add on another one - two days making 5-6 days in total, allowing for chilling the starter and dropping the sediment so I can decant off the spent wort. I dont like adding 3 litres of oxidised starter wort into my beer.
Since a part of your question was how to make a starter : I start by thawing, resting and adding the saved frozen yeast to a cup of sterilised wort and placing it on the stir plate for 1-2 days. Next another 2 litres is added and left on the stir plate for 8-12 hours till fermented out. Now, if its for an ale, its enough yeast and it can be chilled and decanted then pitched. If its for a lager, it must be stepped up even further by adding another two to three litres, however my erlynmeyer flask is only three litres so I chill and decant the spent wort and add another two or three litres of sterilised wort. On the stir plate again for 8 hours, and its done. Chill, decant and pitch. Lagers should be fermented COLD ! and as such, need huge starters for a clean fermentation.
All the above is using 1.035 wort which can be either hopped or unhopped depending on where it came from i.e. it either came from a small mash I've done to make light starter wort. Or from after a boil on brewday where my OG was too high.

adm

Re: Making an yeast starter

Post by adm » Tue Oct 28, 2008 12:48 am

Hopping,

How are you freezing your yeast? Are you making slants, or doing something different?

hoppingMad

Re: Making an yeast starter

Post by hoppingMad » Tue Oct 28, 2008 1:12 am

No not slants. I buy the propagator packs and step up one pack wih 500 mls of starter wort, then pipette 5 mls of dense slurry into autoclaved plastic test tubes containing 2-3 mls of glycerine. So there is 15% glycerine, 30% yeast and some wort in each tube. Shake well, chill 48 hours @ 2 degrees C and then freeze inside a small cooler (chilly bin).
There is enough slurry left over for a batch of beer after stepping up once more.
I'm pretty careful with sanitation but its quite easy.

adm

Re: Making an yeast starter

Post by adm » Tue Oct 28, 2008 9:50 am

Ah....

Thanks! Might give that a try myself.

One other question - regarding the plastic vials, do you buy them single use and sterile wrapped, or are you autoclaving your own?

hoppingMad

Re: Making an yeast starter

Post by hoppingMad » Tue Oct 28, 2008 7:29 pm

adm, ask as many Q. as you wish. I'd like to see more brewers get into this freezing thing. Its a great way to go if you can be bothered with a couple of gadgets. I got my plastic screw top test tubes from a local Path Lab. Yes I think they could be classed as one use. I think they are urine sample tubes !! and have labels on them.
I think you could try what I did, which was to phone them ( any local medical or path lab) and simply ask to buy 40 or 50 tubes. 50 tubes cost me $8.00 which would be about 3 quid. It may be a help if you know a nurse and can use a name. My wife is a nurse for a different Hospital, so I dropped her name in there, which somehow seemed to help ???

I got all the info off the net ( where else) and just did it, with help from guys on another forum. Just place the glycerine into each tube and replace the caps loosely. Stand them up inside a beaker and sit it inside a normal household pressure cooker $ 60 which I already owned. Presure cook for 20 mins, they will be alright and the labels with my writing on them stay intact. Cool and set aside.

I have been pleased and also slightly surprised at the flavour contribution from Wyeast, having tried three strains now. The czech pils yeast bought a lovely nutty flavour to my Pilsener which I was very pleased with after using S-23 many times. S-23 is great, but somewhat limiting. I now have American Ale, Bohemian Lager, Danish Lager, London Ale l, along with the Czech Pils yeast.

A stir plate is a great tool, simple to build ( can post my photos and instructions) and makes great yeast in half the time. Gets the job over with quick.
Cheers.
Hopp.

flything

Re: Making an yeast starter

Post by flything » Tue Oct 28, 2008 9:55 pm

can post my photos and instructions
yes please

hoppingMad

Re: Making an yeast starter

Post by hoppingMad » Wed Oct 29, 2008 12:51 am

MY SIMPLIFIED STIR PLATE. Other much more complicated versions can be seen elsewhere, but this one works just as well and places the building and use of the Stir Plate within reach of electrical novices like me.
Image
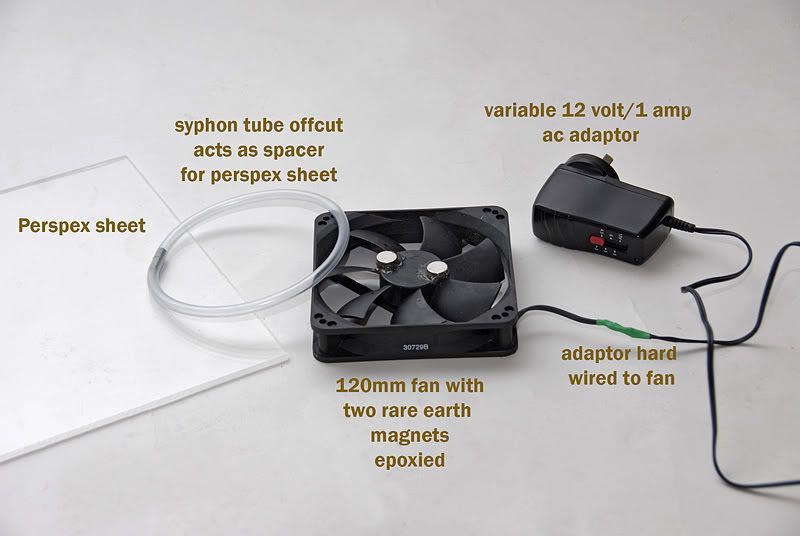
Bits and bobs required
Image
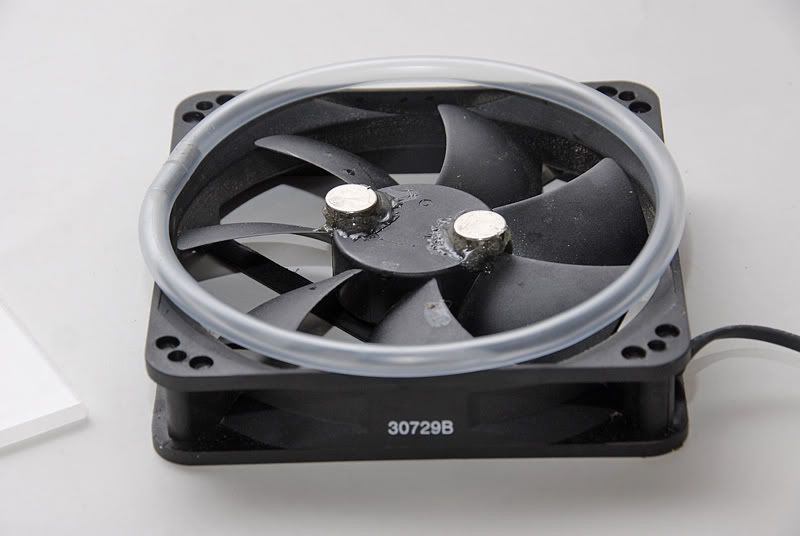
shows computer fan and rare earth magnets with spacer ring to prevent perspex sheet from touching the magnets as the fan spins.
Image
Voltage adaptor, something similar will undoubtedly be available from a good electrical hobby store. On the underside ( not shown) is a little slider which sellects the voltage and permits the fan to operate at different speeds. This is necessary when different volumes of wort are being stirred. i.e. more wort = more resistance to stirring, so need a higher voltage setting to speed up the fan.
Image
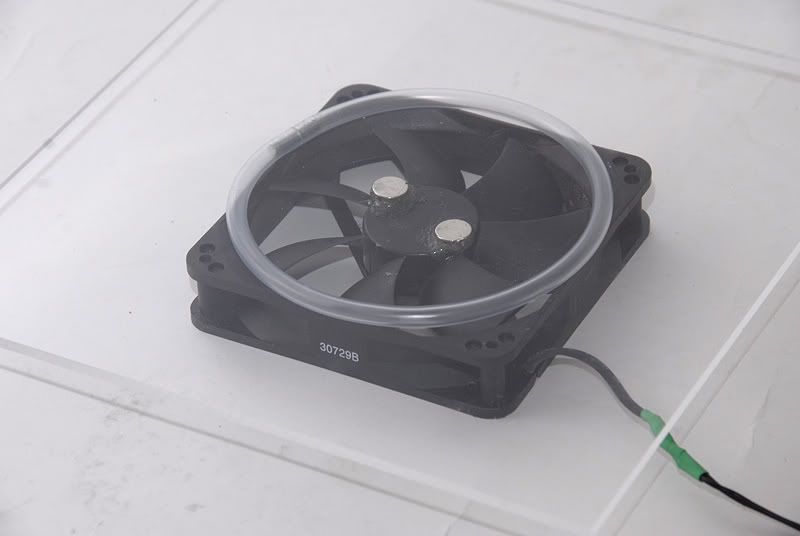
The completed setup ready for use. Note the perspex sheet sitting on the clear tube ring, which acts as a spacer.
Image
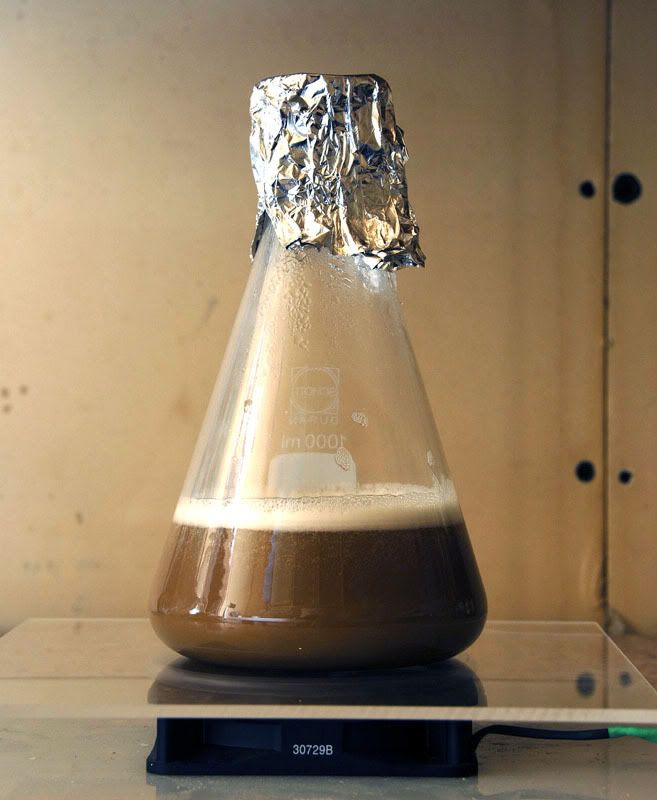
The stir plate in operation. No need to have an obvious vortex, just a good gentle stirring motion seems to be all thats required to aerate and grow plenty of good healthy yeast in a short time. Tasting the wort ( using sanitary technique) after full fermentation ensures the starter is healthy and viable. Remember, it won't taste like beer ! its oxidised and tastes dull and yeasty, but there should be no "off flavour". I have found that the stir plate will ferment out any wort in approximately half the time of a similar static fermentation, and the viable yeast cell count is approximately 1.5 to 2 times that of a non stirred starter.

I will edit this post and add further comments and instructions shortly, have to rush off right now. So check in again later.
Hopp.
EDIT: I thought it easiest to just post this link to my earlier blurb on this project...http://forum.northernbrewer.com/viewtop ... stir+plate
For those who might not know exactly what a stir plate is and what it does ... a stir plate is simply a gadget that stirs your starter wort inside a closed fermentation vessel so it stays sterile ( yeast culture accepted :wink: ). It introduces more O2 into the wort with the stirring action than would otherwise be there. Thus facillitating yeast growth (multiplication). You drop what is known as a stir bar into the flask of sterile wort along with your yeast. The stir bar is a small plastic rod with a magnet inside, these are available from laboratory supply stores and are quite cheap. The flask, usually an Erlymeyer Flask can be used to boil the wort directly on the flame or element of your stovetop, thus eliminating a transfer of wort to the fermenter, the Erlynmeyer flask is then used as the actual fermenter for your starter.
The flask containing wort, yeast and stir bar is then sat on top of your spinning magnets, usually rare earth magnets available from any electrical hobby store. The magnets are epoxied onto a 12 Volt computer fan and as it spins, it also spins the stir bar inside the flask, effecting a whirlpool motion which aerates the wort and keeps the yeast in suspension. The whole thing simply means you are growing more yeast, faster and the cells are more viable. As an example, I have just done my second brew from a propagated frozen vial of yeast, it was a Best Bitter using London Ale 1028. The original frozen culture was less than a thimble full of yeast, stepped up to a correct pitching rate for an ale. I pitched the yeast last Friday about 5 pm. By 9 pm there was a bubble every minute in the airlock. Just took a gravity reading today which is the following Wednesday (5 days) and its at 1.013 and will drop further to around 1.010.
Hopp.

mysterio

Re: Making an yeast starter

Post by mysterio » Wed Oct 29, 2008 6:34 pm

Nice write up hoppingmad, I like your stirplate design.

What does your pils recipe look like out of interest ? I'm planning one for brewing in the next month or so...

hoppingMad

Re: Making an yeast starter

Post by hoppingMad » Wed Oct 29, 2008 9:13 pm

3.2 kgs Bohemian Pils
250 gms Munich
1.5 kgs Flaked Maize
NZ Green Bullet 60 mins
Czech Saaz 15 mins 28 gms
Irish Moss 15 mins
Yeast nutrient 15 mins
Czech Saaz 5 mins 29 gms
Czech Saaz 0 mins 15 gms

Wyeast 2278 Czech Pils 5 litre starter.

OG 1.045 - FG 1.009
IBUs 25
SRM 2.7
Alc. 4.8 %
Ferment 9 degrees C, 2 weeks
Lager 2 degrees C 2-4 weeks.
Bottle with 85 gms dextrose.

A very pale, bright clear Pilsener, ballanced hop presence and rich buscuit maltiness from the yeast. Keep the IBUs down around 25 for this light lager. Mash low, around 64 C or do a step mash for max attenuation. I was aiming for 1.007 but too lazy to step mash and only did a single infusion. I did mash for 2 hours though. I think this would benifit from a single decoction to mash out and would raise the colour to around 4-5 SRM ???
The recipe was based on a Heineken clone a few batches ago, but has changed a bit. The Flaked Maize is instead of Corn Grits and eliminates a cereal mash. If you do a decoction to mash out, I think the cereal mash for grits would be unnecessary. But I get FM real cheap so its a great substitute.
Hopp.

Post Reply