
DIY All Grain Brewery
Re: DIY All Grain Brewery
Hi Kristoff, dont suppose you could add some pics of your hop strainer and mash tun manifold could you, just to get a picture to work on, cheers.
-
Kristoff
Re: DIY All Grain Brewery
No problem - should be doing a brew over the weekend, so I'll take loads of pics of all the bits and pieces i've cobbled together - It might help someonecarpet19 wrote:Hi Kristoff, dont suppose you could add some pics of your hop strainer and mash tun manifold could you, just to get a picture to work on, cheers.
Last edited by Kristoff on Fri Nov 14, 2008 7:42 pm, edited 1 time in total.
-
sparky Paul
Re: DIY All Grain Brewery
Pics are always very welcome on here, and I'm sure they will be appreciated!Kristoff wrote:I'll take loads of pics of all the bits and pieces i've cobbled together - I might help someone
-
jdt199
Re: DIY All Grain Brewery
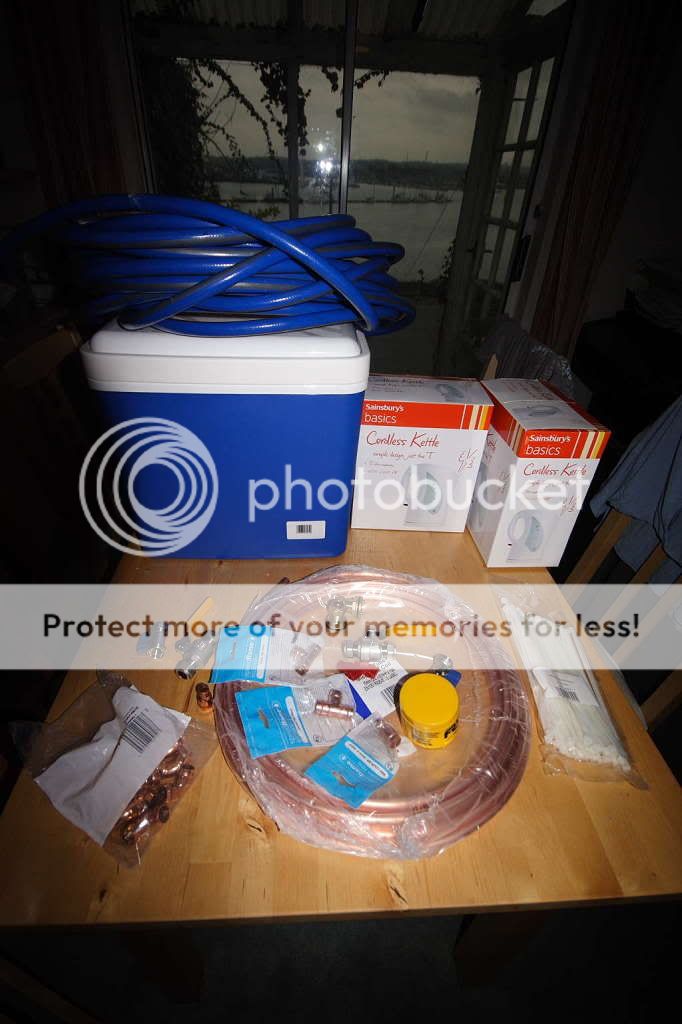
OK its started. Got All the kit toghether and made the CFC Cooler today
Heres the Breakdown of the kit....
Common parts
15mm elbows £3.99 Yorkshire-Solder-Ring-Elbow-YP12-15mm-Pack-of-10
Flux £3.79 Powerflow-Lead-Free-Solder-Flux-Paste-100g
15mm Tee solder ring £3.48 pack of 5 from B &Q (link too long to post)
2m 15mm copper pipe £5.48 from B &Q (link too long to post)
CFC Cooler
10m microfibre pipe £19.28 from B &Q (link too long to post)
Washing machine x2 £1.29 valveWashing-Machine-Valve-Without-C-V
Cable Ties £1.61 Cable-Tie-White-200-x-4-8mm-Pack-of-100
Hose pipe - I had some kicking about but you can get some for less than a tenner at any garden centre.
15mm x 10mm reducer solder ring x 2 £2.78 from B &Q (link too long to post)
Tools
Grips / Pliers
Hack Saw
File
knife
Drill
10mm metal drill bit
Mash Tun
30L CoolBox £16.99 CoolBox from Argos
Tank Coupler £1.49 Comap-Tank-Coupler-15mm
Ball Valve tap x2 £3.45 Full-Bore-Lever-Ball-Valve-15mm
Tools
Hack Saw
File
Drill
20mm flat drill bit
Boiler
10 gallon fermentation bucket £17.99 http://www.hopandgrape.co.uk/catalog/de ... =FER374247
Tank Coupler £1.49 Comap-Tank-Coupler-15mm
Ball Valve tap x2 £3.45 Full-Bore-Lever-Ball-Valve-15mm
Sainsbuys basics kettle x2 £4.85
Tools
Hack Saw
File
Drill
3mm drill bit
Last edited by jdt199 on Sun Nov 30, 2008 4:11 pm, edited 4 times in total.
-
jdt199
Re: DIY All Grain Brewery
First Up the CFC Cooler Heres how it went. A step by step guide....
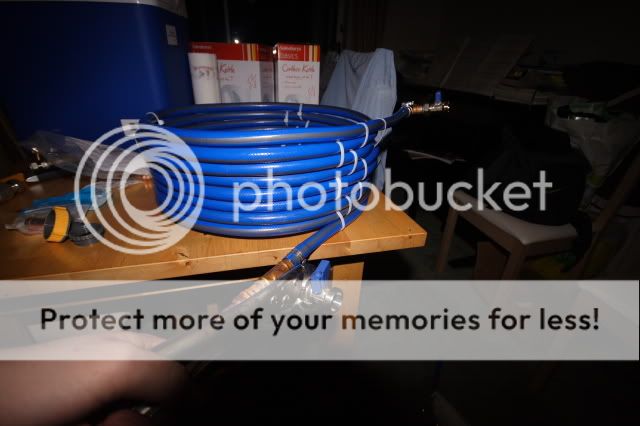
Un-rool your 10mm microfibe and measure out the same lenth of hose to cut to length. I did this inside (It was raining) and it went all the way from the kitchen all the way upstairs. I recommend doing this outside if the weather is OK. After measuring force the hose pipe over the copper pipe. I connected the hose to the tap first and pumped hot wather through it for a few minutes first. I found this sofened the hose which helped. I also put some washing up liquid down the host to help with lubrication. It was a tough job getting the hose on but I think it would have been easier if it was straight hence why I recommend doing it outside where you have space.

Once the hose is on Find a cylindrical object with a suitable diameter to coill the pipe around. I used the kitchen dustbin. Coil the pipe around, calble tie-ing as you go.
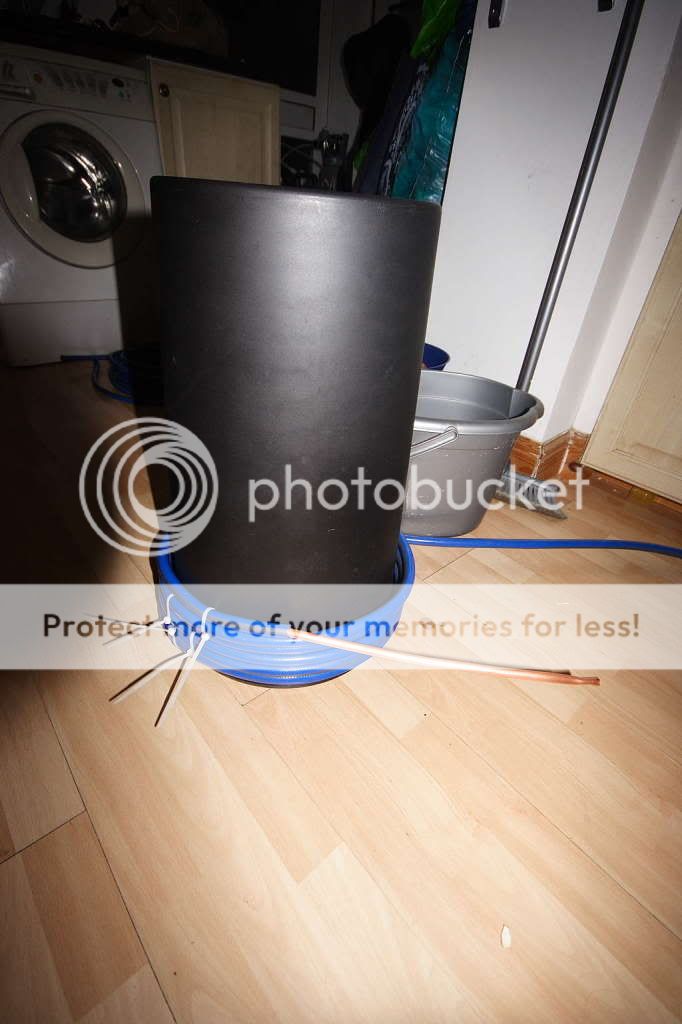
once finished tidy up the ties and trim the hose so that about 1 foot of the copper is sticking out each end.
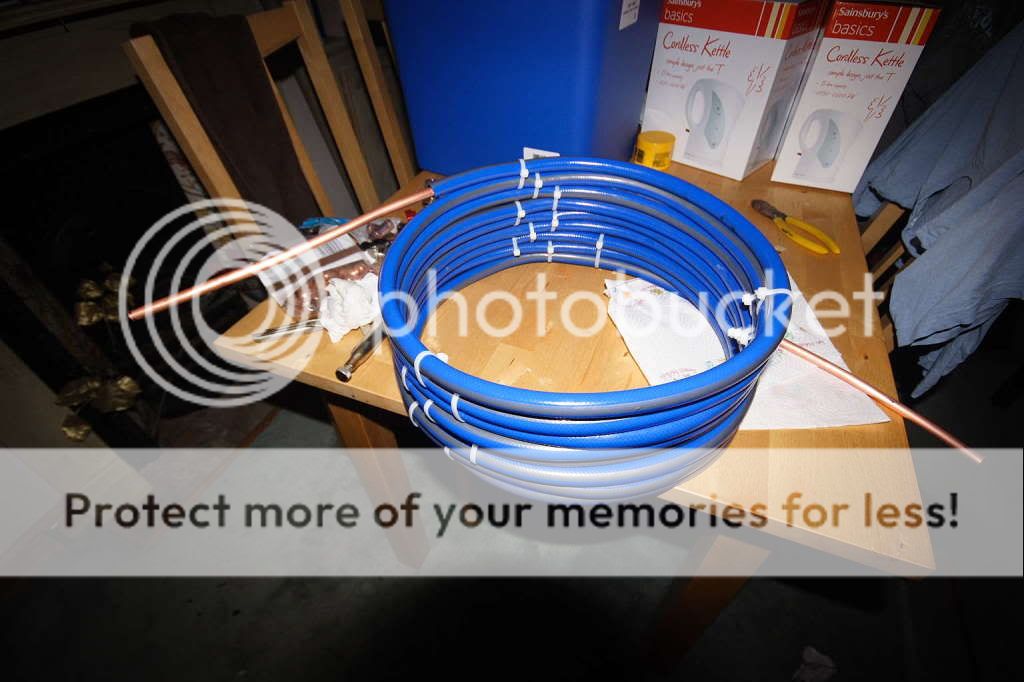
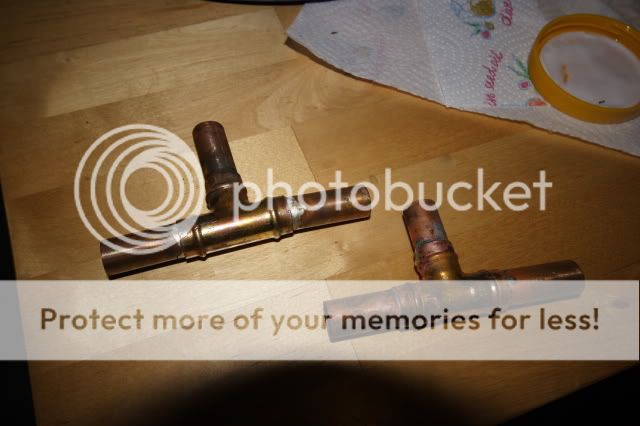
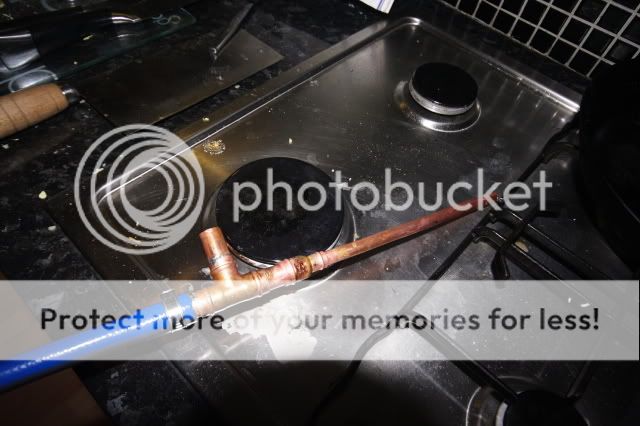
Assemble the fitting for the hose connectors. Cut 6 lengths of 15mm copper pipe about 1.5 inches long and file ends and clean with some flux. Flux the inside of the 15mm Tee piece solder rings and the outside of the copper pieces and assemble as below.
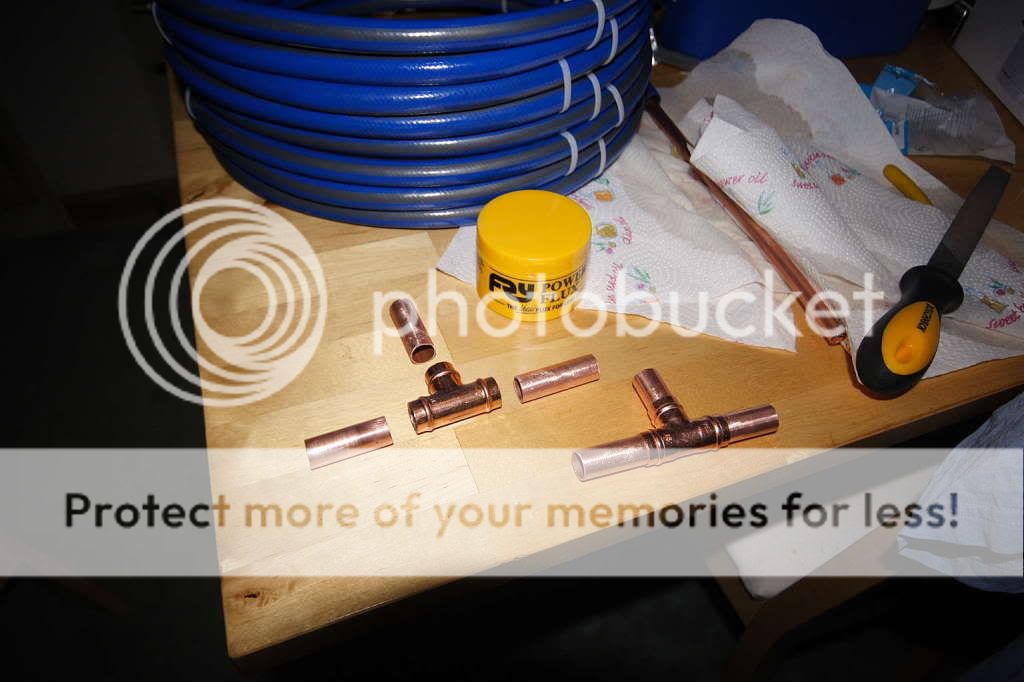
Solder together... I used the cooker as I diddn't have a blow torch. As I have bought solder ring fittings I diddn't need to buy any solder either. Seemed to all work OK, even if the final result was a little messy.

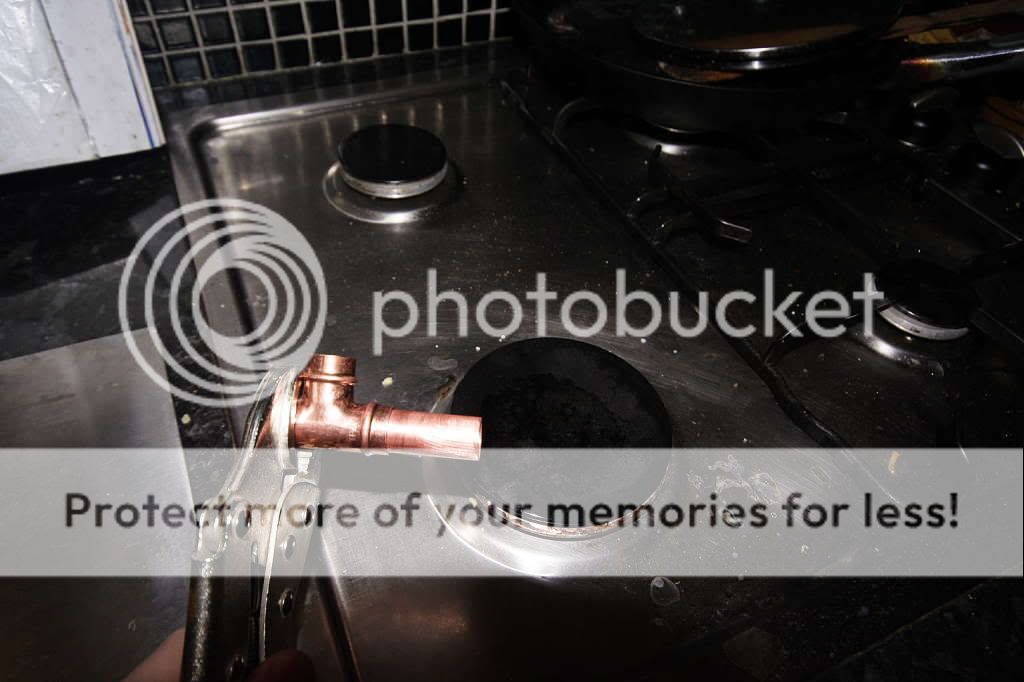
slide over some butterfly clips over hose at each end and slide on a tee piece assembly too. Then force the hose over the end of the 15mm pipe on one side of the tee piece. Again I used boiling water to soften the hose first.
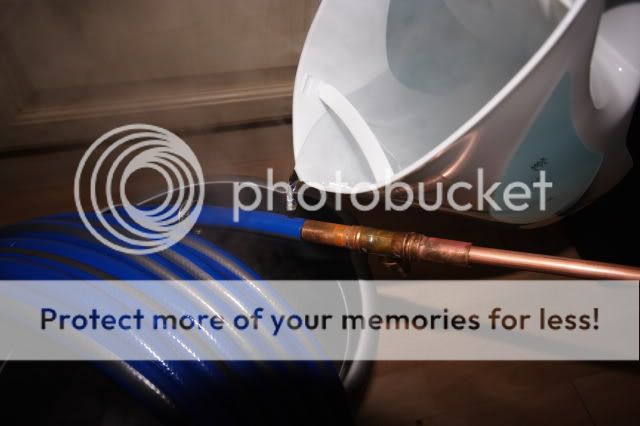
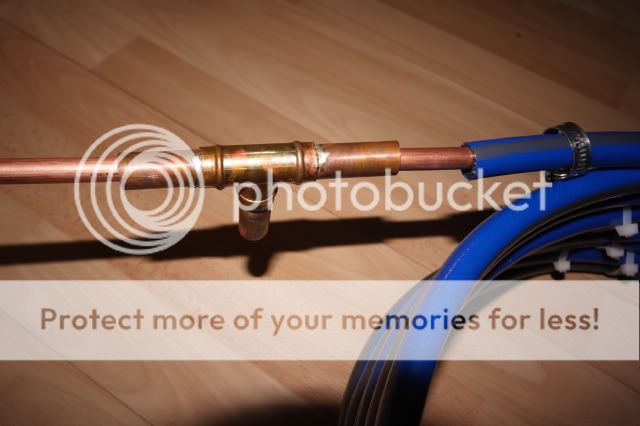
Drill out the 15mm x 10mm reducer with a 10 mm drill bit as it will be too tight to fit over the 10mm pipe otherwise. Then slide over the 10mm pipe at each end. Add flux and solder to both the 15mm tee pice assembly and also the 10mm pipe. See below
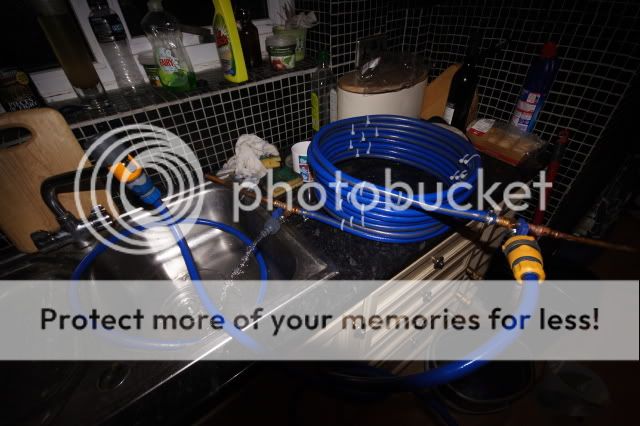
Finally add the washing machine connectors (they are compression fitting so just tighten with some grips of pliers. The washing machine connectors screw straight to a standard hose pipe connector.
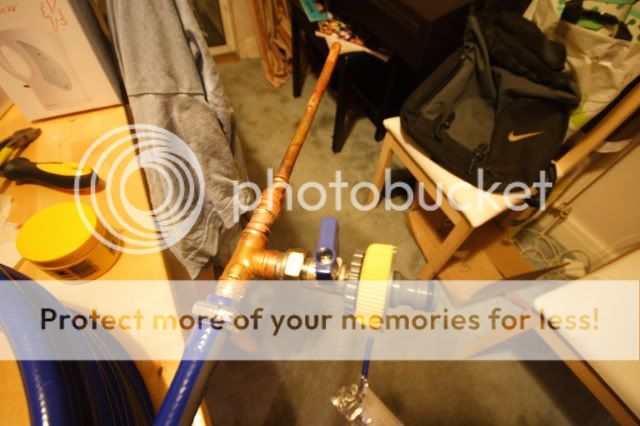
And a quick test and I seems there are no leaks!! Can't wait to try it out on my first AG brew!!
Tomorrow I will build the mash tun and post pics of that too.
Many thanks to Kristoff and Sparky paul for the tips on where to get the stuff toghether.
Un-rool your 10mm microfibe and measure out the same lenth of hose to cut to length. I did this inside (It was raining) and it went all the way from the kitchen all the way upstairs. I recommend doing this outside if the weather is OK. After measuring force the hose pipe over the copper pipe. I connected the hose to the tap first and pumped hot wather through it for a few minutes first. I found this sofened the hose which helped. I also put some washing up liquid down the host to help with lubrication. It was a tough job getting the hose on but I think it would have been easier if it was straight hence why I recommend doing it outside where you have space.
Once the hose is on Find a cylindrical object with a suitable diameter to coill the pipe around. I used the kitchen dustbin. Coil the pipe around, calble tie-ing as you go.
once finished tidy up the ties and trim the hose so that about 1 foot of the copper is sticking out each end.
Assemble the fitting for the hose connectors. Cut 6 lengths of 15mm copper pipe about 1.5 inches long and file ends and clean with some flux. Flux the inside of the 15mm Tee piece solder rings and the outside of the copper pieces and assemble as below.
Solder together... I used the cooker as I diddn't have a blow torch. As I have bought solder ring fittings I diddn't need to buy any solder either. Seemed to all work OK, even if the final result was a little messy.
slide over some butterfly clips over hose at each end and slide on a tee piece assembly too. Then force the hose over the end of the 15mm pipe on one side of the tee piece. Again I used boiling water to soften the hose first.
Drill out the 15mm x 10mm reducer with a 10 mm drill bit as it will be too tight to fit over the 10mm pipe otherwise. Then slide over the 10mm pipe at each end. Add flux and solder to both the 15mm tee pice assembly and also the 10mm pipe. See below
Finally add the washing machine connectors (they are compression fitting so just tighten with some grips of pliers. The washing machine connectors screw straight to a standard hose pipe connector.
And a quick test and I seems there are no leaks!! Can't wait to try it out on my first AG brew!!
Tomorrow I will build the mash tun and post pics of that too.
Many thanks to Kristoff and Sparky paul for the tips on where to get the stuff toghether.
Last edited by jdt199 on Sun Nov 30, 2008 10:20 pm, edited 2 times in total.
-
sparky Paul
Re: DIY All Grain Brewery
Excellent pics! 
I don't know which way to go myself - IC. CFC, or I've got a plate heat exchanger which strips down for cleaning...
I don't know which way to go myself - IC. CFC, or I've got a plate heat exchanger which strips down for cleaning...
Re: DIY All Grain Brewery
Very good how-to 
Sparky - I think a basic IC is less work to make, but it's a personal choice.
Sparky - I think a basic IC is less work to make, but it's a personal choice.
-
jdt199
Re: DIY All Grain Brewery
I think the IC is the most popular as its easier to make but I think the CFC is more effiecient at cooling, especially if you pump the wort through it. The only downside of a CFC is I imagine I will have to pump some sanitiser through it before use, where as with an IC you can just pop it in with the boil to sanitize.
-
jdt199
Re: DIY All Grain Brewery
OK 2/3 the way there now. Mash Tun finished!
See post above for equptment and tools.
It went like this.....
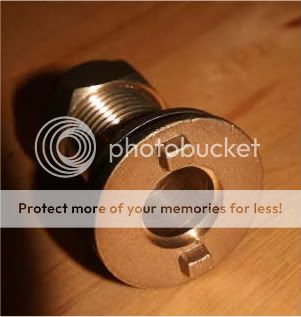
1 - First take your tank connector. You will find that it has a collor that prevents a 15mm copper pipe being pushed all the way through but you will need to push it all the way through to connect the ball valve to it so you need to file down this collor with a round file. This takes a bit of time but its ok if you do it while watching something on the tv and its only brass! Keep filing and testing with your copper pipe untill you can push the pipe all the way through.

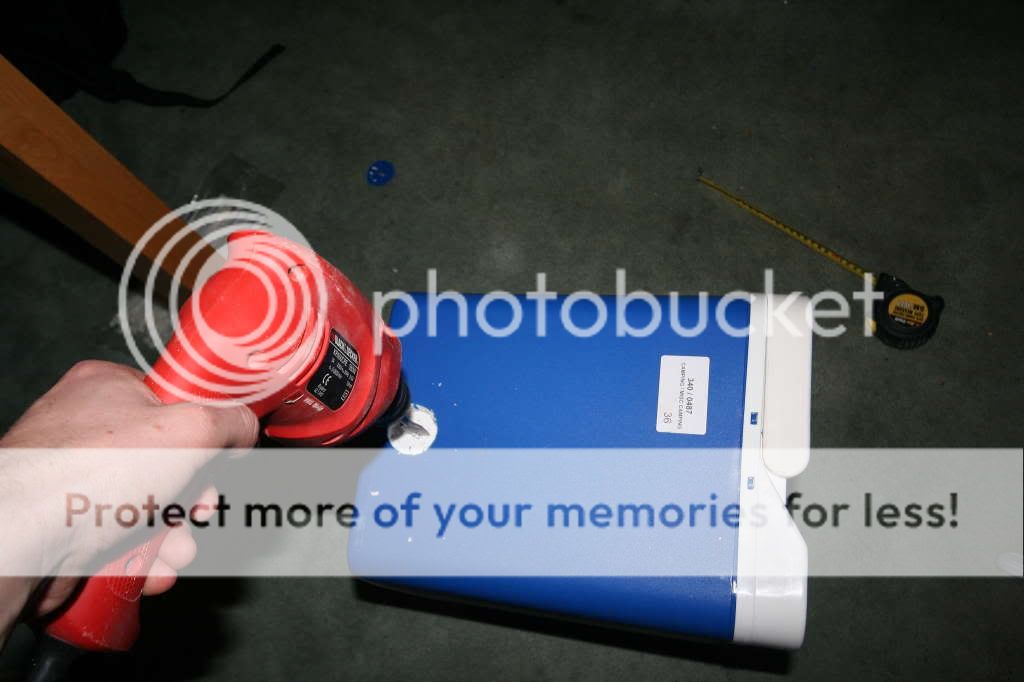
2 - Now measure up where to cut your hole in the coolbox to fit the tank connector. The tank connector fits in a 20mm hole but you will need to cut a bigger hole in the outer skin wall of the coolbox so you can screw the tank connector fitting in. The tank connector fitting is 35mm in diameter so any hole above that size will do. I used a 40mm bit which was ideal. The tank connector also need to fit the 15mm copper pipe so that it can sit on top of another 15mm copper pipe on the bottom of the coolbox. See below and you will see what I mean. On the Argos coolbox the cenre of the hole needed to be 40mm from the bottom.

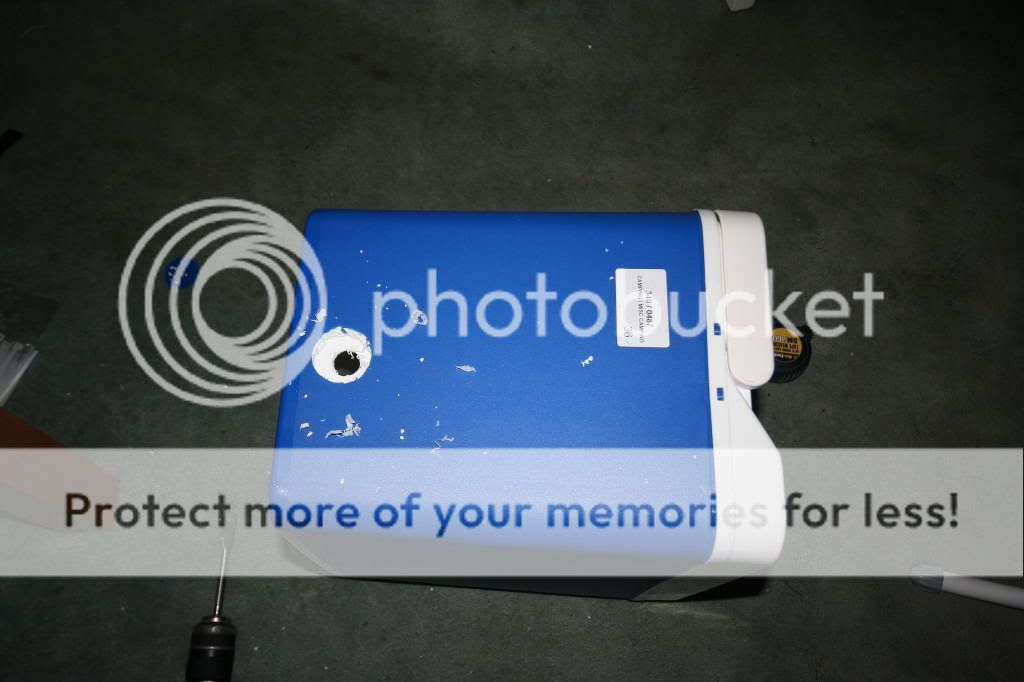
3 - Drill the hole through the outer skin being carefull not to go through the inner skin. It might help to drill a pilot hole through both skins first, this its what I did. After drilling the large hole through the outer skin, cut out the polystyrene insulation where the hole is.


4 - Now drill your 20mm hole through the inner skin and fit the tank connector in it.


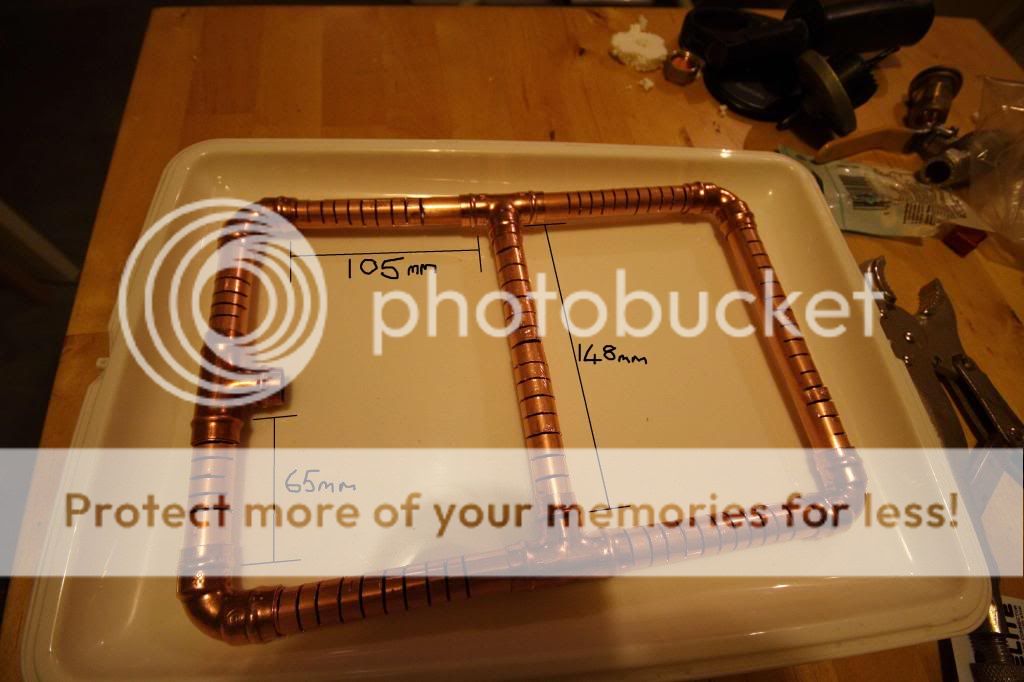
5 - Measure out the copper pipe and solder rings needed to make the strainer. For the strainer I used 4 elbows, 3 tee pieces and cut pipe in the following sizes if your using the argos cooler. If not measure up:
4 x 105mm
2 x 65mm
2 x 148mm
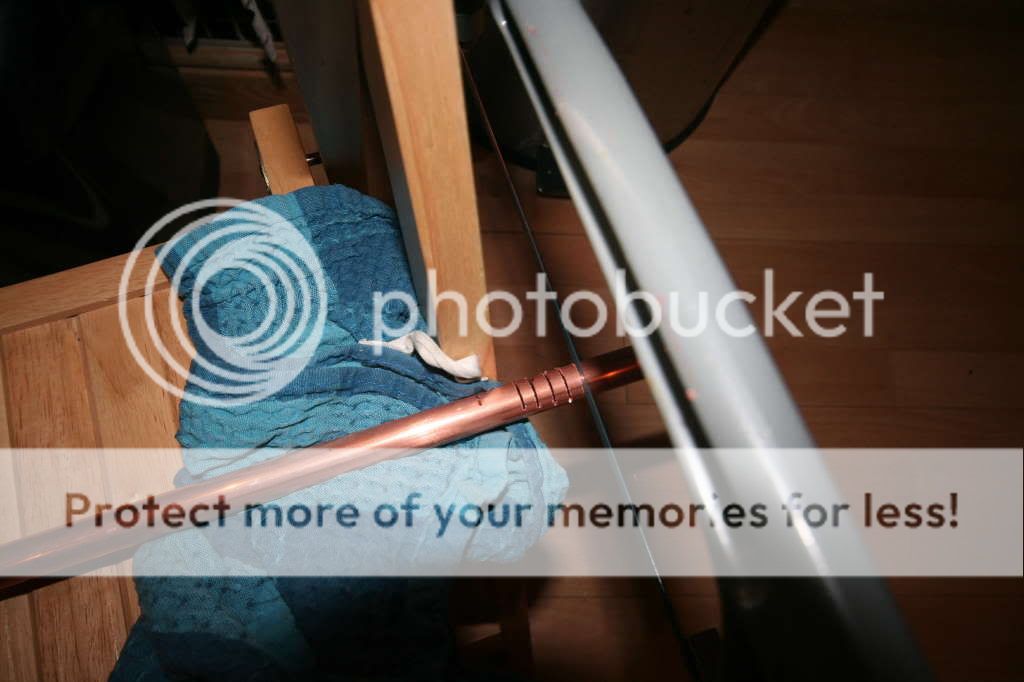
6 - Cut to length you pipe and also cut slots into the pipe nearly half way through the pipe roughly every 8mm apart, but leave gaps at each end to fit the pipes to the solder rings.
I recommend marking the pipe lengths and cutting all the slots BEFORE cutting to length. It is much easier to cut the slots on a long piece of pipe than a small one, I found, especially without a vice. This is hard work so make sure you have a good hacksaw blade!

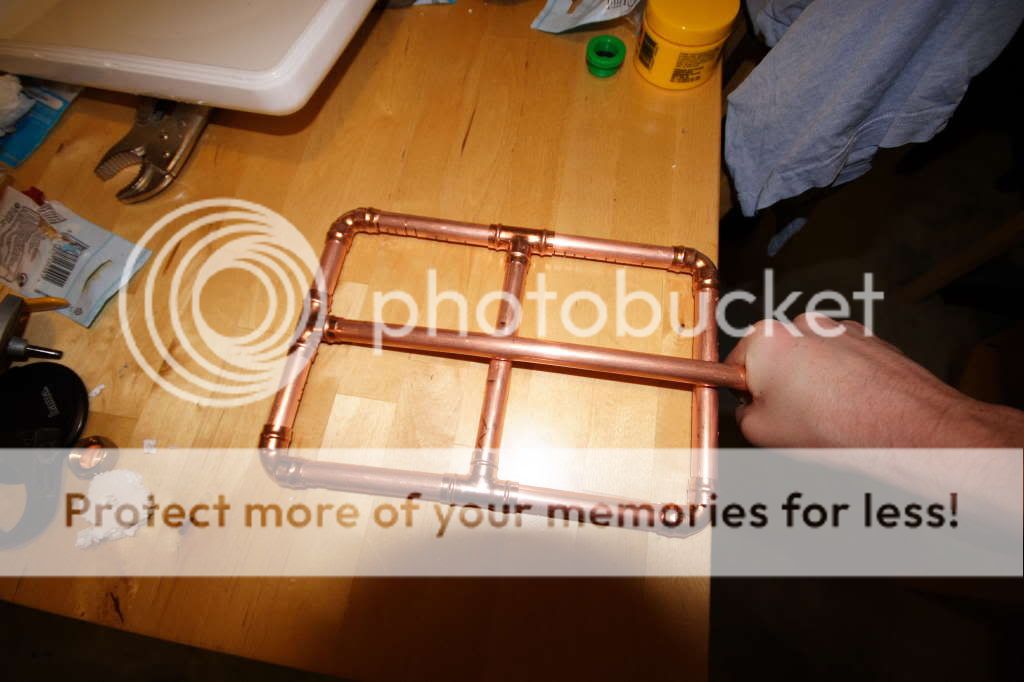
7 - Now push fit all your pieces together on the coolbox lid as a template
8 - You now want to cut a length of copper pipe to fit from the back tee piece of the striner, through the tank connector to connect to your ball valve. IN my case this was 350mm long but its worth measuring to check. After cutting fit one end to your tee piece and bend the copper pipe over the middle piece of the strainer manifold so that it rins parrellel with the other pipes in the manifold. See below.
9- Now remove this pipe from the rest of the manifold and push through the tank connector from the inside of the coolbox. Once inside reassemle the manifold underneeth the pipe and connect up.

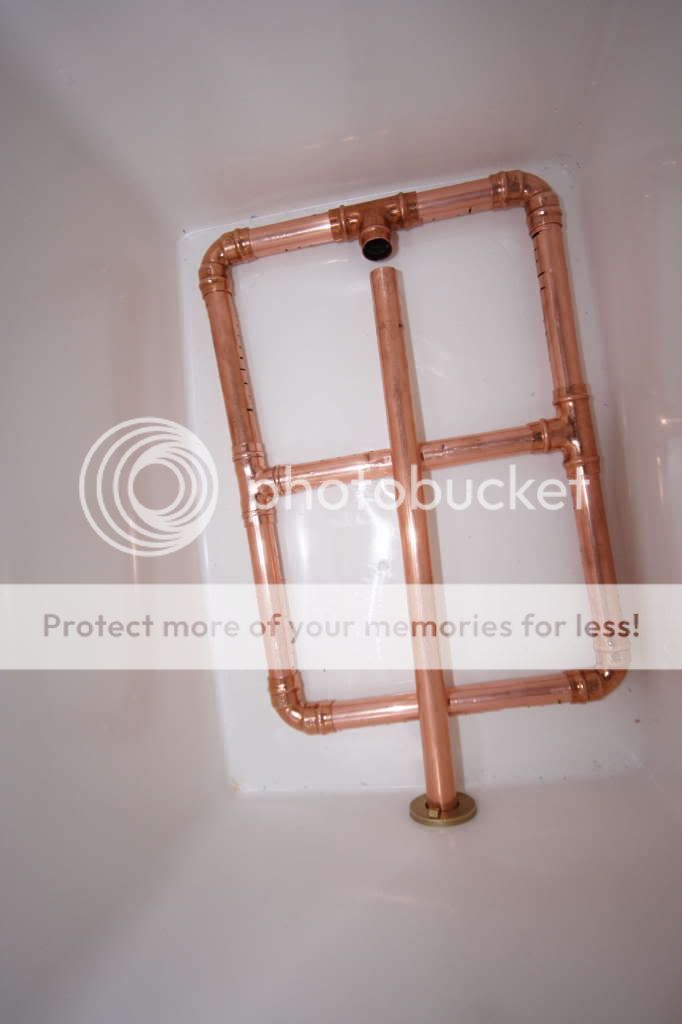

10 - Now tighten up the compression fitting on the tank connector making sure that there is enough pipe to fit the compression fitting of the ball valve onto. EDIT - Use ptfe tape on the thread of this fitting to prevent leaks.


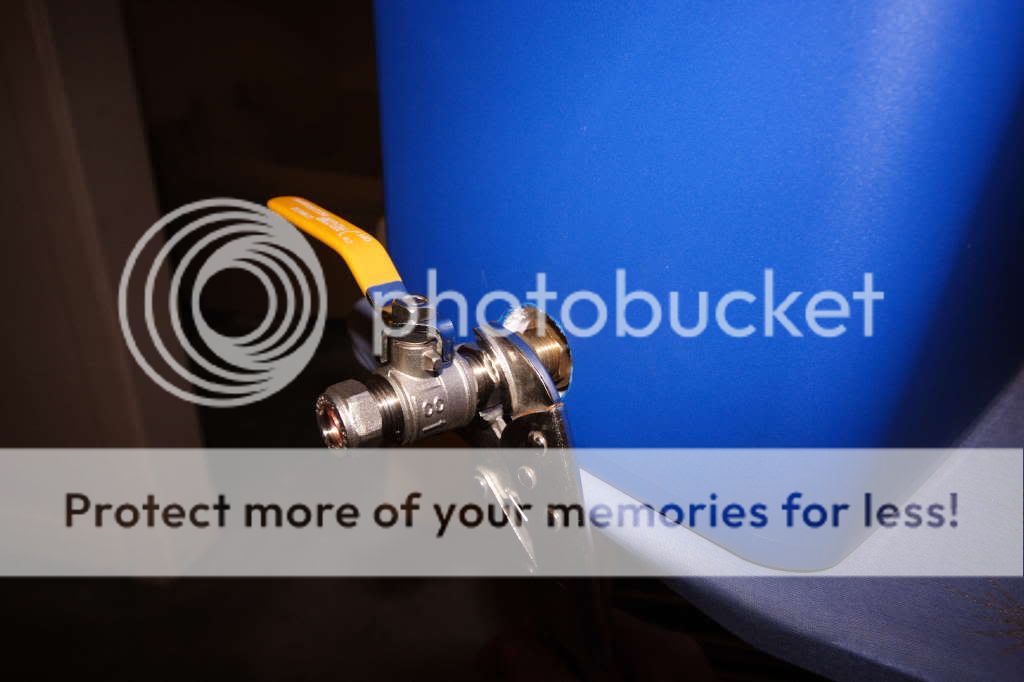
11 - finally fit your ball valve using the compresstion fitting supplied. EDIT - Again use ptfe tape on the thread of this fitting to prevent leaks.
Thats it!! Mash tun done. I end up with about 3 pints of dead space at the bottom after testing and you should probably add some extra insualtion in the form of a blanklet when using as it is only a cheap coolbox (if you are using the argos one like me).
Next up. The boiler... Moving ever closer to my first AG brew.
See post above for equptment and tools.
It went like this.....
1 - First take your tank connector. You will find that it has a collor that prevents a 15mm copper pipe being pushed all the way through but you will need to push it all the way through to connect the ball valve to it so you need to file down this collor with a round file. This takes a bit of time but its ok if you do it while watching something on the tv and its only brass! Keep filing and testing with your copper pipe untill you can push the pipe all the way through.
2 - Now measure up where to cut your hole in the coolbox to fit the tank connector. The tank connector fits in a 20mm hole but you will need to cut a bigger hole in the outer skin wall of the coolbox so you can screw the tank connector fitting in. The tank connector fitting is 35mm in diameter so any hole above that size will do. I used a 40mm bit which was ideal. The tank connector also need to fit the 15mm copper pipe so that it can sit on top of another 15mm copper pipe on the bottom of the coolbox. See below and you will see what I mean. On the Argos coolbox the cenre of the hole needed to be 40mm from the bottom.
3 - Drill the hole through the outer skin being carefull not to go through the inner skin. It might help to drill a pilot hole through both skins first, this its what I did. After drilling the large hole through the outer skin, cut out the polystyrene insulation where the hole is.
4 - Now drill your 20mm hole through the inner skin and fit the tank connector in it.
5 - Measure out the copper pipe and solder rings needed to make the strainer. For the strainer I used 4 elbows, 3 tee pieces and cut pipe in the following sizes if your using the argos cooler. If not measure up:
4 x 105mm
2 x 65mm
2 x 148mm
6 - Cut to length you pipe and also cut slots into the pipe nearly half way through the pipe roughly every 8mm apart, but leave gaps at each end to fit the pipes to the solder rings.
I recommend marking the pipe lengths and cutting all the slots BEFORE cutting to length. It is much easier to cut the slots on a long piece of pipe than a small one, I found, especially without a vice. This is hard work so make sure you have a good hacksaw blade!
7 - Now push fit all your pieces together on the coolbox lid as a template
8 - You now want to cut a length of copper pipe to fit from the back tee piece of the striner, through the tank connector to connect to your ball valve. IN my case this was 350mm long but its worth measuring to check. After cutting fit one end to your tee piece and bend the copper pipe over the middle piece of the strainer manifold so that it rins parrellel with the other pipes in the manifold. See below.
9- Now remove this pipe from the rest of the manifold and push through the tank connector from the inside of the coolbox. Once inside reassemle the manifold underneeth the pipe and connect up.
10 - Now tighten up the compression fitting on the tank connector making sure that there is enough pipe to fit the compression fitting of the ball valve onto. EDIT - Use ptfe tape on the thread of this fitting to prevent leaks.
11 - finally fit your ball valve using the compresstion fitting supplied. EDIT - Again use ptfe tape on the thread of this fitting to prevent leaks.
Thats it!! Mash tun done. I end up with about 3 pints of dead space at the bottom after testing and you should probably add some extra insualtion in the form of a blanklet when using as it is only a cheap coolbox (if you are using the argos one like me).
Next up. The boiler... Moving ever closer to my first AG brew.
-
GBH
Re: DIY All Grain Brewery
Hi there!
Wow! Brilliant Stuff, I have struggled with my Mashtun as I only had drills, its leaking slightly but im only using a plastic tap.
I havent yet made the copper strainer for the mash tun using a mashing and sparging bag, but yours looks great!
Any news on the Boiler? Id be really interested in that as i nearly bought one yesterday and they really are way too expensive so id like to see how you get on with yours!
Thanks a million!
Wow! Brilliant Stuff, I have struggled with my Mashtun as I only had drills, its leaking slightly
I havent yet made the copper strainer for the mash tun using a mashing and sparging bag, but yours looks great!
Any news on the Boiler? Id be really interested in that as i nearly bought one yesterday and they really are way too expensive so id like to see how you get on with yours!
Thanks a million!
-
jdt199
Re: DIY All Grain Brewery
Im going to order the 10 gal fermentation bin for the boiler from hop and grape today so I should have some pics of the build next week sometime. I'm just deciding on a recepie for my first brew so I can order the grain and hops at the same tine. Any ideas anyone?? I was thinking of a TTL clone. Is this a good idea for a first vag brew?
-
Parva
Re: DIY All Grain Brewery
I'd say TT Landlord would be an excellent first brew due to only using two simple hop additions, recipe here :- viewtopic.php?f=5&t=14524&p=175109&hili ... rd#p175109
I personally would reduce the boil (and water required to hit 23l) to 90 minutes but either way I'm sure that would be a good starter.
I personally would reduce the boil (and water required to hit 23l) to 90 minutes but either way I'm sure that would be a good starter.
-
blackadder
Re: DIY All Grain Brewery
One tip on the cooler, I have used exactly the same 8mm tubing and garden hose. There is an 8mm to 1.2cm or so copper expander joint that slots on the end, this is almost perfect bore for garden hose. The hose end needs to be warmed well in boiling water then slots on to the 1.2cm side. As it cools the seal is almost perect but I have added small Jubilee type clips to prevent leakage.
I doubt you will get the copper much cheaper, you might just need to do the maths as it may be almost as cheap to buy a pre-fab one from Hope and Grape.
I doubt you will get the copper much cheaper, you might just need to do the maths as it may be almost as cheap to buy a pre-fab one from Hope and Grape.
-
jdt199
Re: DIY All Grain Brewery
Parva wrote:I'd say TT Landlord would be an excellent first brew due to only using two simple hop additions, recipe here :- viewtopic.php?f=5&t=14524&p=175109&hili ... rd#p175109
I personally would reduce the boil (and water required to hit 23l) to 90 minutes but either way I'm sure that would be a good starter.
That looks great, but what is the final volume of this recepie if I am to reduce it to 23l? Also what volumes do you guys brew? A cornie holds 4 gallons, which seems a little feeble but 5 gallons means you have to faf bottling 8 or so pints. Is it best to do 8 gal brews so you can do 2 cornies?
-
Parva
Re: DIY All Grain Brewery
There are plenty of online calculators for estimating boil-off, I personally use this one :- http://www.jimsbeerkit.co.uk/batch_calculator.html
I also use Beersmith which can estimate this but prefer the online calc. I aim for 23l for a cornie. Why? Because there's always losses here and there I find and I usually end up with a full cornie and perhaps a 2l PET bottle (Tango or suchlike). My last brew that I've just kegged I aimed for 50l and scaled up the ingredients to suit and sure enough I filled 2x 19l kegs (near to brim) and 1x 9l keg for portability.
Most recipes are based on a 23l brewlength and I find it easier to stick with that and accept some losses or (as usually happens) a little spare fermented wort which I'll bottle or ditch depending on what's left.