
New brewshed build
-
Scott-ayling
Re: New brewshed build
Have you thought about a big cooler box filled with ice bottles and pipe ducting and fan to blow cold air into your cupboard when cooling is needed.
-
aamcle
- Drunk as a Skunk
- Posts: 908
- Joined: Tue Jan 15, 2013 11:42 am
- Location: Newton-le-Willows ( St Helens/Warrington)
Re: New brewshed build
2 ideas.
1, Use the top section electric cool box but that is inefficient.
2, Cut a hole in the side of your cabinet the size of a fridge door. Take the door off a fridge and seel it to the cabinet add a PC fan to move the air.
Aamcle
1, Use the top section electric cool box but that is inefficient.
2, Cut a hole in the side of your cabinet the size of a fridge door. Take the door off a fridge and seel it to the cabinet add a PC fan to move the air.
Aamcle
My Site:- http://www.frankenbrew.co.uk
-
Fil
- Telling imaginary friend stories
- Posts: 5229
- Joined: Sun Oct 16, 2011 1:49 pm
- Location: Cowley, Oxford
Re: New brewshed build
- a lot of work, but if you can dig a deep hole and bury a plastic bin 200l+? filed with water it will provide a fairly stable cool store, and a small dc pump could recirculate it thru a radiator in the cupboard? but it would be a lot of digging.
a 1000l ibc cube would be great, fill with clean water and its a fallback for when the russians invade and the yanks nuke us.
a 1000l ibc cube would be great, fill with clean water and its a fallback for when the russians invade and the yanks nuke us.
ist update for months n months..
Fermnting: not a lot..
Conditioning: nowt
Maturing: Challenger smash, and a kit lager
Drinking: dry one minikeg left in the store
Coming Soon Lots planned for the near future nowt for the immediate
Fermnting: not a lot..
Conditioning: nowt
Maturing: Challenger smash, and a kit lager
Drinking: dry one minikeg left in the store
Coming Soon Lots planned for the near future nowt for the immediate
-
themadhippy

- Even further under the Table
- Posts: 2970
- Joined: Tue Dec 08, 2009 12:53 am
- Location: playing hooky
Re: New brewshed build
if you bury 4 ibc's ,on at each corner of the shed they can also double up as shed anchor points if it gets a bit windy
Warning: The Dutch Coffeeshops products may contain drugs. Drinks containing caffeine should be used with care and moderation

Re: New brewshed build
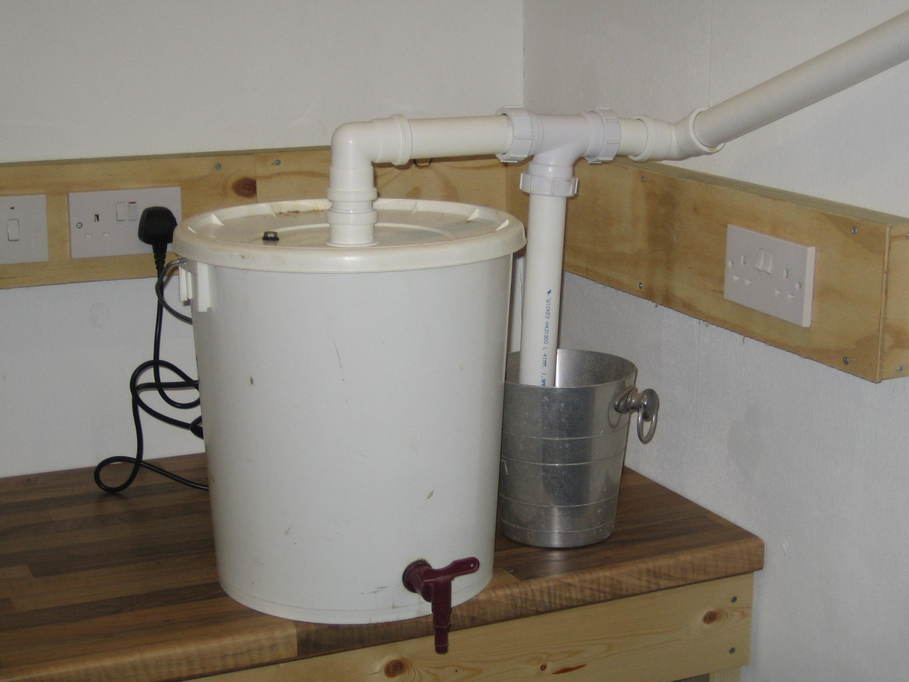
Today I got my old boiler set up. Other than doing a lot of cleaning of all the stuff that's been stashed away in the cellar for ages, this is I think the last step before I can actually start brewing again. The one thing I did have to do was to sort out where the steam is going to go. I bought a 40mm tank fitting for the lid of the boiler and made up some pipework to take the steam out through a window for the time being. I also put in a "trap" so that the larger part of any condensation inside the pipe should run off into a bucket rather than back into the wort. Here's how it looks:
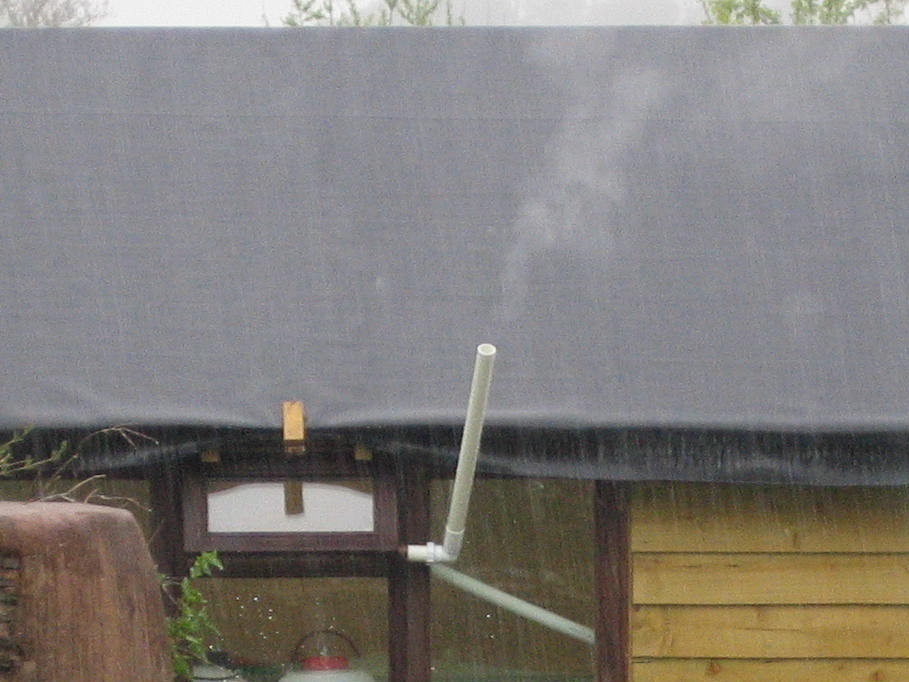
And here it is under test with a fairly fierce boil, working nicely. You can also see quite how hard it was raining this afternoon
The compression fittings allow me to split the pipework so I can close the window and to allow the lid of the boiler to be removed.
I'll be using this until I can get the new HLT and boiler all set up. I might fit half a "P" trap to the top, so it doesn't fill up with rain in the future.
James
Re: New brewshed build
Bit more progress, but no more photos as yet...
My wife returned home from a trip to Ikea with a load of their "scrap" stuff -- mostly the sides of tall flat-pack cupboards and wardrobes. I've used them to make a decent size "preparation area" about six feet long by two feet deep which allows me to store empties underneath and gives me somewhere to put the laptop, scales for weighing out ingredients and so on. That done I got on with actually brewing and have five gallons of London Pride in the fermentation cabinet at the moment.
I've also used the Ikea scrap to make a load of shelves and a stand for a Belfast sink which must have been sitting about waiting for me to find a purpose for it for a decade or more. I found one of those monobloc mixer taps with a removable shower head type spout on ebay for less than £15. Looks like it should be good for cleaning stuff. That's now fitted although it isn't plumbed in yet. This evening I fitted the waste system for the sink, so even if I can't fill it from the tap yet I can at least empty water down it.
Stuffing insulation into all the walls was definitely a good idea. By the time I was done this evening it was far too cold to be outside in short sleeves, but quite pleasant inside.
Next steps are probably to get some more stuff cleaned up after its long stay in the cellar, sort out at least cold water to the tap and make the shelf for the fermentation cabinet so I can have two beers fermenting at the same time. Oh, and if the London Pride is ready to bottle this weekend, get that done and get another brew under way. Which means I also have to add a tap to a plastic fermenter so I can use it for bottling using my new bottle filler.
James
Re: New brewshed build
And I am now typing the beer shack whilst waiting for some water to heat so I can clean some kit. I have cold water plumbed in using a temporary pipe, but that is fine for now.
James
James
Re: New brewshed build
I've not posted an update for a while, so I must remedy that...
I've now done four brews and the fifth is in progress, started today. The first four used only my old kit, but having built my new HLT (viewtopic.php?f=6&t=72558) I wanted to be able to fill it easily as there's very little clearance for the lid once it stands on top of the fermentation cabinet.
To that ends I have done some pipework to take water through a filter and around the top of the walls to feed the HLT Inlet. I can now stand and turn the tap and watch the water level rise in the sight gauge until I get the volume I want. So much easier than measuring water with a jug
I actually had a bit of a nightmare with the plumbing. I'm quite happy doing it, but for some reason when I was soldering up the pipes, the solder just wouldn't run properly and I had a pig of a time making neat joints. Eventually I decided to have a break and leave it until we got back from holiday. When we got back home I decided there must be something wrong with the flux, so I binned it, got some more and everything worked beautifully from there.
I'll try to remember to grab a few photos tomorrow if I can.
James